With Planoly, you can upload your video content to either our Multi-Channel Workspace or our Instagram Planner. Both planners allow you to plan, organize, schedule, and auto-post your Reels directly from Planoly's web dashboard. Alternatively, you can opt to schedule a reminder, either through email or push notification, to post your content manually at the perfect time, using either the web dashboard or mobile app. When you auto-post a Reel through Planoly, it seamlessly becomes part of your Instagram feed enhancing your social media presence with ease.
How to Auto-Post a Reel from the Web Dashboard
Multi-Channel Workspace
- Tap on the account switcher and open up your Multi-Channel Workspace
- Tap on + New Post
- Select Instagram
- Change post type to Reel from the dropdown bar
- Upload Reel
- Add a Cover photo if needed
- Toggle on Auto-Post
- Select Date/Time
- Add description and/or Hashtags
- Schedule
Instagram Planner
-
Open the web dashboard and tap the “+ New Post” button
-
Choose a source and upload a video
-
Select Upload as a Reel
-
Select your file and click Upload - your Reel has now been uploaded to your grid as an unscheduled post!
-
From your grid, click on your Reel and choose a date and time to auto-post your Reel
-
Your Reel post will be auto-posted to Instagram via Planoly
How to Add a Cover Photo for Auto-posting
Instagram Planner
- Create a new post in the Instagram Planner
- Upload as "Reels Grid Only" as your content type

- +Upload Cover
- Select your thumbnail
- Upload
- Tap on the video
- Schedule as usual with auto-post toggled on
You can toggle on/off the share to feed toggle:

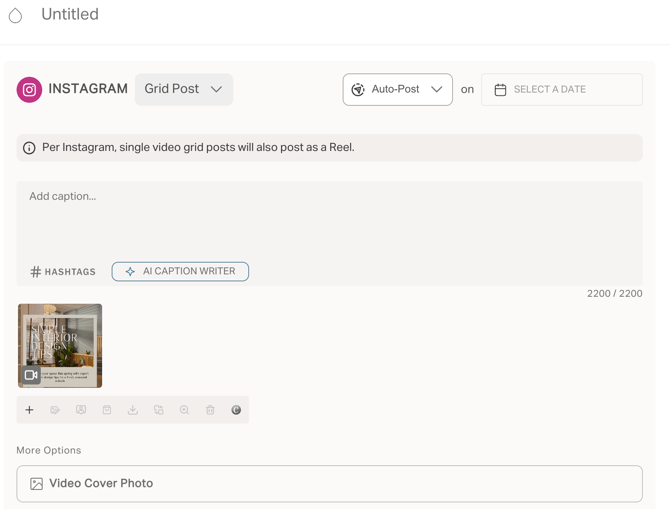
Multi-channel Workspace
- Within the post creation, click on the Video Cover Photo under More Options to select the image
FAQs
What happens after you schedule a Reel for manual posting?
-
Once it’s time to post your Reel, you’ll get a push notification on your phone or an email reminder
-
Click on it from your phone, and you will be taken into the app to post now - Your Reel & cover photo will be auto-downloaded to your phone, and your caption will be automatically copied for quicker posting
-
Click “Post Reel”, and it will take you to the Instagram app to publish it!
-
Upload your media (it should be at the top of your camera roll for easy access)
-
Make any finishing edits in IG's editor, paste your caption, and share your Reel to IG!
Additional Resources: How To Enable Push Notifications (Mobile, Web & Email)
How do I delete/remove a Reel from the grid?
To remove any unwanted Reels from your Planoly Instagram Planner grid, follow the steps below.
On Web:
- Log into your Planoly account on a computer
- Hover your cursor over the Reel you wish to delete
- Click on the red "X" at the top right of your Reel
- Click on Confirm when the next popup appears
On Mobile:
- Open the Planoly mobile app
- Click on the Reel you wish to delete from your grid
- Click on Delete in the top right of your Reel
- Click on OK when the next popup appears
- Your Reel has now been removed from Planoly
Can I add a Cover Photo on Mobile for the Instagram Planner and Multi-channel Workspace?
Yes! Cover photos are available on iOS mobile devices within both planning spaces.
Can I add audio to my Reel?
For Reels that are set up for auto-posting, you will not be able to add trending audio through Planoly. What you can do instead is schedule a reminder notification and post it manually including the trending audio.
Format Requirements

